This is part of our series of blogs on the posterior chain. In this blog, we’ll take a detailed look at the best posterior chain exercises for beginners – with detailed walk-throughs and the expert thinking behind our recommendations.
Why might beginners want to improve their posterior chain?
For any beginner a crucial first step in ensuring the exercises you are performing are performed effectively is to practice and execute perfect (or at least as close to perfect) form possible. If you can learn how the muscle in focus moves each body part and what its main movement ranges are you are more than half way on your journey to understanding and learning how to move effectively and efficiently. Furthermore, developing what we know in the industry as ‘mind-muscle” connection is also an important skill to learn prior to increasing load (weight) in the exercises you choose to add to your posterior chain workouts.
This adage is particularly true when it comes to using the posterior chain and performing exercises which are posterior chain dominant. Due mainly to our adapted lifestyles (think desk posture and long periods of sitting) the posterior chain (hamstrings, glutes and lower back muscles mainly speaking) tend not get activated and remain much of their time in a stretched and non-active position which over time causes weakness.
Whilst all muscle systems in the body are important, paying a biassed attention to the posterior chain is (in most people’s case – general population) a very worthwhile investment of time and energy as the posterior chain is what keeps us upright (erect) and in good posture. Simply put, all the muscles on the fronts of our bodies pull us forward and all the muscles on the back of our bodies help pull us back & keep us erect. Balancing out the pulling back and ‘erectness’ is crucial for most of us who spend large amounts of our day seated and in a forward, curled up position.
Including posterior chain exercises in your daily/weekly program will ensure that you remain strong, supple and stable across all movement plans whilst at the same time it will assist with improved overall strength & good posture. An efficient posterior chain usage will cross over to many day to day tasks providing the additional benefit of improved daily function.
Why are posterior chain exercises important for beginners?
The main reasons posterior chain exercises are important for both beginners and indeed anyone participating in programmed resistance exercise are:
- They help improve your overall posture
- They use the largest muscles in the body therefore providing a lot of ‘bang for buck’ from a workout and energy expenditure standpoint
- They look great! Sorry – had to say it!
- The mastery of the posterior chain movements will provide a direct crossover into almost any sport & also almost any day to day functional activity (think putting the dishes away, picking up your children or putting them to bed)
- They help build full body strength, stability and suppleness
In short, whether you’re training to be a better sports person, a better person OR just to move better in general, you want to consider making the posterior chain your friend! Master the movements, apply time to practising deliberately, gradually increase the load and stress you apply to your body using the movements and watch all the above come to reality.
Bodyweight Pelvic Bridge
How do I do it?
- Start by lying on a mat on your back on the floor
- Bend your knees and have feet hip width apart (your feet want to be approximately 1 hand distance away from your bottom)
- Tilting your pelvis towards your nose, gradually roll your hips upwards towards the ceiling (peeling the spine off of the mat one vertebrae at a time)
- Once you reach the top position, hold for 1s and then slowly return in the same manner (one vertebrae at a time) until you reach the bottom
- Reset and complete as many reps as you have programmed
Why is it good for me?
The bodyweight pelvic bridge is great exercise for a number of reasons:
- It helps improve your understanding of you hips and correct movement of the hips and lower back
- It activates the major posterior chain muscles (hamstrings, glutes and lower back)
- It improves overall strength and activation of the hamstrings, glutes and lower back
- It improves overall spinal mobility
- It’s great to to be used as either a warm up exercise OR as a part of your main workout
How do I make it easier?
With the floor lying bridge, this is really as easy as it can get, however, if you are suffering or recovering from injury, completing half reps and half range of motion versions of the above are totally fine also. This way you can build slowly towards a full range bodyweight pelvic bridge.
How do I make it harder?
To progress this exercise you can use a step or platform (or anything you can place your feet on which is stable and is above floor level). Place your feet onto the higher surface and complete the exact same steps as above. By taking your feet higher you increase the range of motion therefore making the exercise more challenging. You can also add a small weight by holding a dumbbell or plate on your hips to increase the load.
Coaches top tip
To engage the hamstrings more, lift your toes off the floor and focus on really pushing the heel into the ground.
Can I see someone demonstrate it?
Long Lever Pelvic Bridge
How do I do it?
- Start by lying on a mat on your back on the floor
- Bend your knees and have feet hip width apart (your feet want to be approximately 1 hand distance away from your bottom)
- Tilting your pelvis towards your nose, gradually roll your hips upwards towards the ceiling (peeling the spine off of the mat one vertebrae at a time)
- Once you reach the top position,walk your feet anywhere between 6 inches and 12 inches from where they currently are therefore lengthening the position of the body by placing your feet further away from the bottom
- Hold the position isometrically (no movement just hold) as per your program and requirements
Why is it good for me?
This exercise is a fantastic way to build strength in the posterior chain due to its isometric nature. It’s very user friendly and can be performed by almost any level of fitness. Its also an incredibly effective way to teach you how to engage your hamstrings (which some people struggle with in the early phases of training).
How do I make it easier?
Simply don’t take your feet too far away from the bottom therefore lessening the distance between feet and bottom. If you are a complete beginner simply holding a standard pelvic bridge could be enough of a challenge.
How do I make it harder?
To progress this exercise you can use a step or platform (or anything you can place your feet on which is stable and is above floor level). Place your feet onto the higher surface and complete the exact same steps as above. By taking your feet higher you increase the range of motion therefore making the exercise more challenging. You can also add a small weight by holding a dumbbell or plate on your hips to increase the load.
Coaches top tip
Use this as a pre-exhaust superset with exercises such as barbell or dumbbell hip thrusts or deadlifts. By activating the hamstrings and glutes first you will find you gain better overall recruitment in the main exercise prescribed.
Can I see someone demonstrate it?
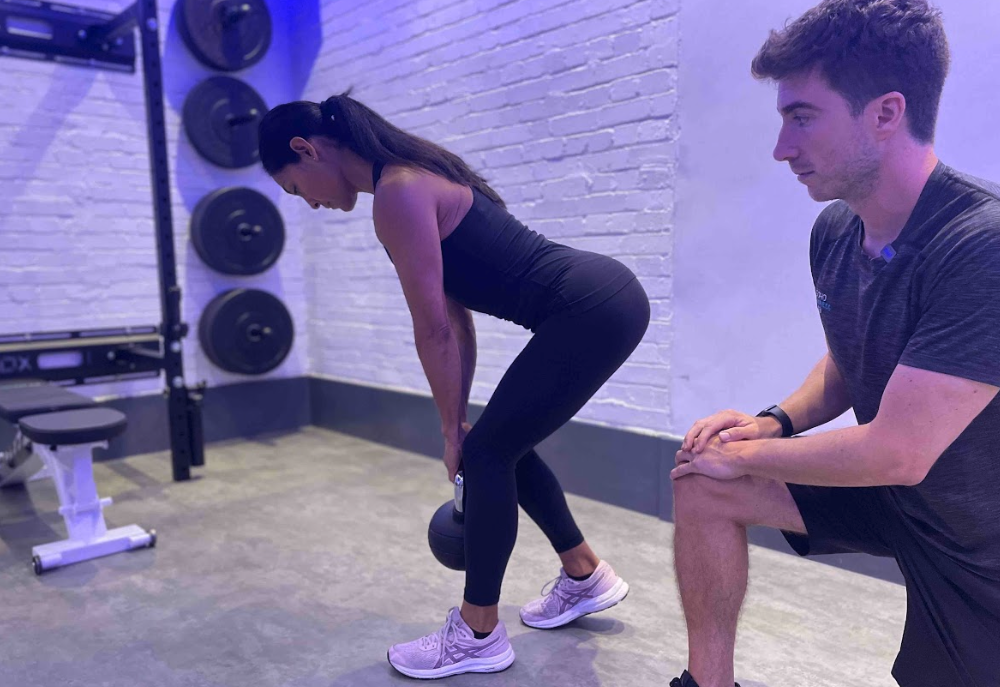
Split Stance Single Leg Deadlift Using Dumbbell
How do I do it?
- Using either dumbbells, kettlebells or even just bodyweight to start (depending on experience) start with one foot forward approximately 1 foot’s length in front so you are essentially in a small split stance stance.
- Ensuring you keep your shoulders neutral, core engaged and feet firmly planted on the floor, drive your hips backwards keeping a soft bent knee with the foot that is behind and keep the foot in front straight
- Hinge from your hip as much as you can taking flexibility and exercise experience into account and aim to feel the exercise working hamstrings, glutes and lower back
- When returning ensure that you extend the hips using the glutes and keep shoulders set at all times
Why is it good for me?
This is a fantastic way to build up your skill acquisition towards completing a full deadlift. Its also a great way to activate the posterior chain and strengthen at the same time. By being in a split stance it’s also a great way to build up skill acquisition towards completing a single leg deadlift.
How do I make it easier?
Using bodyweight only is one of the best ways to make this exercise easier.
How do I make it harder?
You can make this exercise harder by increasing the load (adding weight) and also taking it further into a single leg deadlift which is where your back foot will leave the floor and reach out backwards with a straight leg adding the further challenge or balance and core stability.
Coaches top tip
Practice the hinging motion from the hips ensuring you learn how to maintain core stability, shoulder stability and foot connection with the floor before going into full range of motion. Skills first, then execute.
Can I see someone demonstrate it?
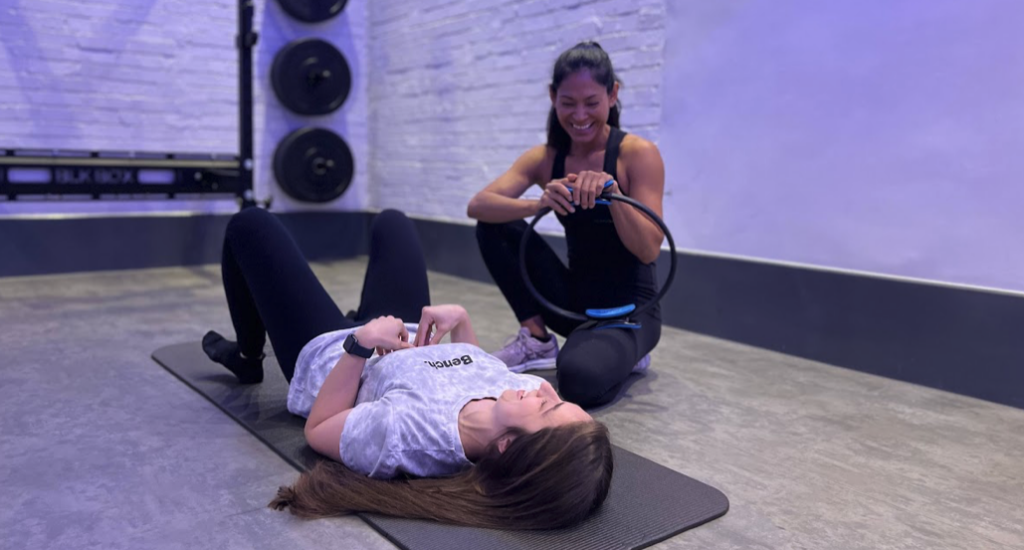
Prone Lying Isometric Hamstring Squeeze
How do I do it?
- Take a mat and lie on your front with your forehead parallel to the floor and neck position nice and neutral (use a towel or something soft to support if needed)
- Bend both knees until 90 degrees at the knee joint
- Squeeze and activate your glutes and then, without changing the position of the knee, aim to lift your upper leg off the mat towards the ceiling. Although you won’t get very far in terms of the range of motion, this queue will provide you with the right information to engage your hamstrings and glutes.
- Hold the heightened position isometrically as per your program
Why is it good for me?
This exercise requires very little equipment and can be done anywhere at any time. It’s fantastic for those needing to learn how to engage the posterior chain, and it’s also fantastic as a warm-up/activation and/or pre/post exhaust superset in a main program.
How do I make it easier?
You can make this exercise slightly easier by working with a straight leg as opposed to a bent knee position.
How do I make it harder?
You can make this exercise harder by squeezing a ball (preferably pilates ball) Or Pilates ring between your knees. This will further engage your hamstrings and adductors making the exercise more challenging.
Coaches top tip
Keep your head parallel to the floor whilst at the same time keeping ever such a small gap between your belly button and the floor to ensure you are holding a neutral spine at all times. This will provide you with the added benefit of your core working during the exercise also.
Safety First
Remember, the movements and techniques you see demonstrated here are advanced exercises, and our team has practised them countless thousands of times. It’s always a good idea to have professional guidance when you’re exercising – and this is especially true when you’re using free weights.
If you’d like to talk to us about training with us here in London at our Soho, Fitzrovia, or Mayfair studios, we’d love to help. Equally, if you’re somewhere else in the world – we can be by your side virtually using our innovative online training app and video call guidance.